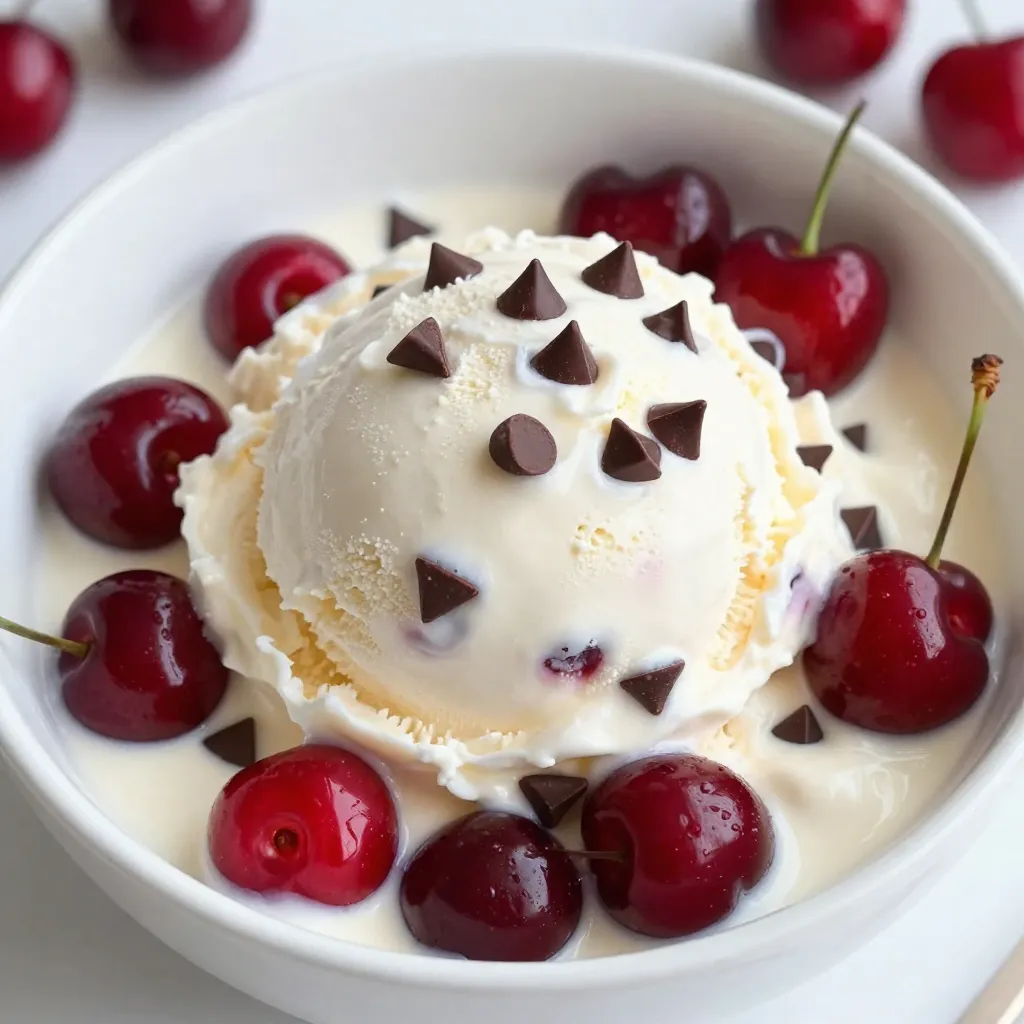
If you’re craving a sweet treat, homemade Cherry Chocolate Chip Ice Cream is a must-try! This delightful and creamy dessert bursts with fresh cherry flavor and rich chocolate bits. In this article, I’ll guide you through every step, from selecting your ingredients to storing your ice cream. Get ready to impress your friends and family with this easy and delicious recipe that is sure to satisfy your sweet tooth!
Why I Love This Recipe
- Fresh and Fruity Flavor: This ice cream captures the essence of summer with the vibrant taste of fresh cherries, making each bite a delightful experience.
- Chocolatey Goodness: The mini chocolate chips add a rich, creamy contrast to the tart cherries, creating a perfect balance of flavors.
- Homemade Delight: Making ice cream at home is a fun and rewarding process, allowing you to customize it to your liking.
- Perfect for Any Occasion: This ice cream is a hit at gatherings, picnics, or simply as a refreshing treat on a hot day.
Ingredients
Measurements of Key Ingredients
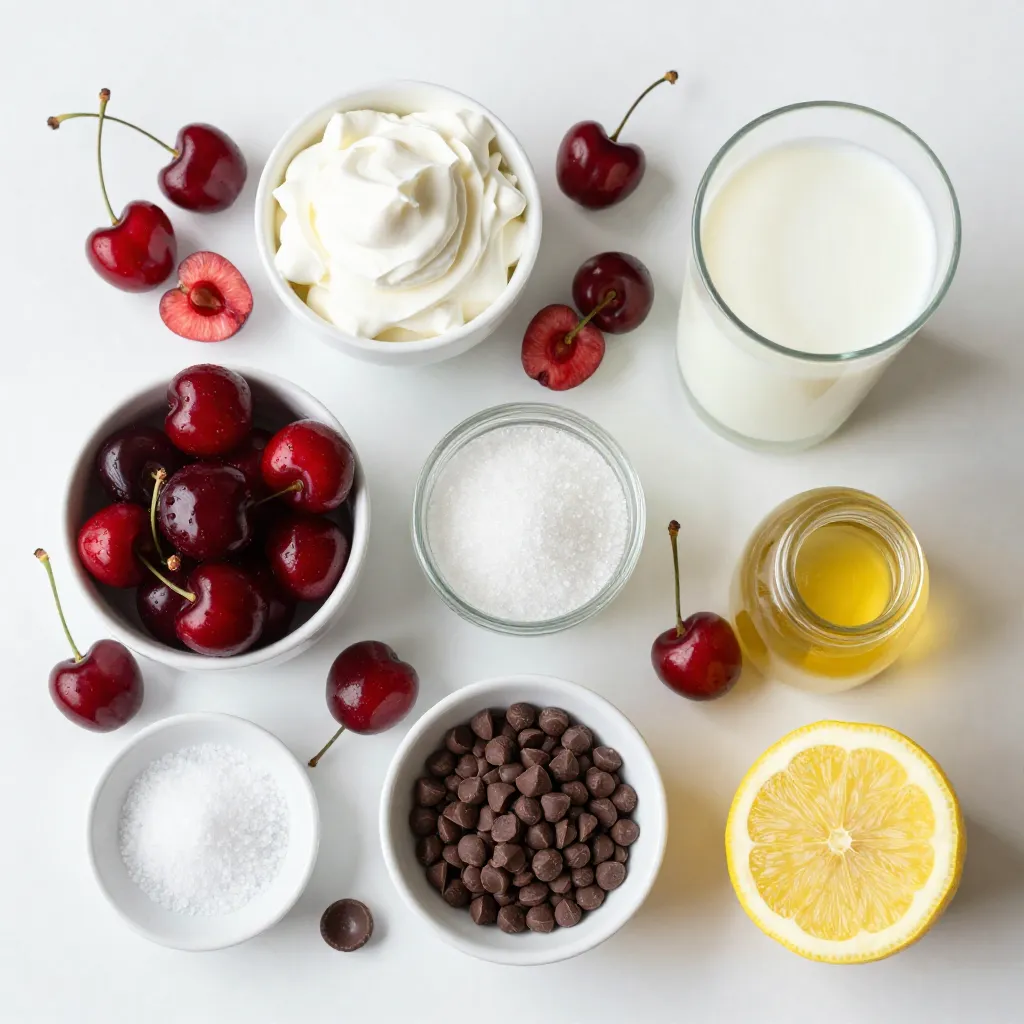
When making Cherry Chocolate Chip Ice Cream, you need:
– 2 cups fresh cherries, pitted and halved
– 1 cup heavy cream
– 1 cup whole milk
– 3/4 cup granulated sugar
– 1 teaspoon pure vanilla extract
– 1/2 cup mini chocolate chips
– 1 tablespoon freshly squeezed lemon juice
– Pinch of sea salt
These amounts create a rich and creamy ice cream. Each ingredient plays a key role in flavor and texture. The cream and milk make it smooth, while the cherries add sweetness.
Fresh vs. Frozen Cherries
I prefer fresh cherries for this recipe. They have a vibrant taste and better texture. However, frozen cherries work too if fresh ones are not available. Just make sure to thaw them first. This helps them blend easily into the mixture.
Substitutions for Dairy
If you’re looking for dairy-free options, you have choices. You can replace heavy cream and milk with coconut cream or almond milk. These alternatives give a nice flavor. Just ensure they are unsweetened to keep the balance right. Enjoy experimenting with these options!
Step-by-Step Instructions
Preparing the Cherry Mixture
First, take your fresh cherries and pit them. Cut each cherry in half. In a medium saucepan, mix the cherries with 3/4 cup of granulated sugar and a pinch of sea salt. Set your stove to medium heat. Cook this mixture for about 5 to 7 minutes. Stir it occasionally. You want the cherries to soften and release their juices. After cooking, take the pan off the heat. Add 1 tablespoon of freshly squeezed lemon juice. Let the mixture cool a bit. Then, blend it until smooth. Remember to leave some small chunks for texture. Set this cherry mixture aside.
Making the Cream Base
In a separate bowl, pour in 1 cup of heavy cream and 1 cup of whole milk. Add 1 teaspoon of pure vanilla extract. Whisk these together until they blend well and thicken slightly. This mix gives your ice cream that rich and creamy texture. Next, gently mix in the cherry mixture. Stir it until the cherry flavor spreads evenly throughout the cream base. This step is crucial for a balanced taste.
Churning the Ice Cream
Now, it’s time to churn! Pour your combined mixture into your ice cream maker. Follow the manufacturer’s instructions. Usually, this takes about 20 to 25 minutes. You want the ice cream to become thick and creamy. In the last few minutes, add 1/2 cup of mini chocolate chips. This will give your ice cream a delightful chocolatey surprise. Once done, transfer the ice cream into an airtight container. Smooth the top with a spatula. Freeze it for at least 4 hours. This will make your ice cream firm and ready to enjoy!
Tips & Tricks
How to Achieve Creamy Texture
To get a creamy texture in your ice cream, start with cold ingredients. Use cold heavy cream and whole milk. This helps the mixture blend well. Next, churn your ice cream for the right amount of time. If you churn too long, it gets too hard. If you don’t churn enough, it becomes icy. Aim for that perfect thick and creamy feel.
Storage Tips for Homemade Ice Cream
Store your ice cream in an airtight container. This keeps it fresh and prevents ice crystals. If you want to keep it even better, press a piece of plastic wrap against the surface before sealing. This helps block air. Homemade ice cream lasts about two weeks in the freezer. After that, it may lose some flavor and texture.
Serving Suggestions
Serve your cherry chocolate chip ice cream in chilled bowls. This keeps it cold longer. Top each scoop with a few fresh cherries. A drizzle of chocolate sauce adds a nice touch too. For a fun twist, serve it with a side of warm brownies. The warm and cold contrast makes every bite tasty!
Pro Tips
- Use Fresh Cherries: The best flavor comes from fresh, ripe cherries. If possible, choose organic cherries for a more intense taste.
- Chill Your Mixture: Before churning, refrigerate the combined ice cream mixture for at least 1 hour. This helps it churn faster and improves texture.
- Don’t Rush the Freezing: Allow the ice cream to freeze for at least 4 hours for the best consistency. This ensures a creamy texture rather than icy.
- Experiment with Mix-Ins: Feel free to add other mix-ins like nuts or different types of chocolate to customize your ice cream to your taste.
Variations
Adding Other Ingredients (nuts, flavor extracts)
You can make this ice cream even more fun by adding nuts or flavor extracts. Chopped walnuts or almonds add a nice crunch. They pair well with cherries and chocolate. Try adding a teaspoon of almond extract for a sweet twist. It enhances the cherry’s flavor and adds depth. You can also mix in some toasted coconut for extra texture. Each addition gives a new layer of taste.
Vegan or Dairy-Free Options
If you want a vegan version, use coconut milk instead of cream and milk. Coconut milk makes the ice cream rich and creamy. You can also use almond milk for a lighter option. Swap the mini chocolate chips with dairy-free ones. Be sure to check that your sugar is vegan too. This way, everyone can enjoy this tasty treat, no matter their diet.
Using Different Chocolate Types
Experimenting with different chocolates can change the whole ice cream vibe. Dark chocolate chips add a rich, bold flavor. Milk chocolate chips can make it sweeter and creamier. You might even try white chocolate chips for a unique twist. Each type of chocolate brings its own taste, making every batch special. Mixing chocolate types can also create exciting flavor combinations.
Storage Info
Best Practices for Freezing Ice Cream
To keep your cherry chocolate chip ice cream fresh, store it properly. Use an airtight container. This helps avoid air exposure. Make sure to smooth the top before sealing. Cover the surface with plastic wrap for extra protection. This reduces ice crystals forming. Freeze the container in the coldest part of your freezer. Avoid opening the freezer too much. This keeps the temperature steady.
How Long Does It Last?
Homemade cherry chocolate chip ice cream lasts about 2-3 weeks in the freezer. After this time, it may lose flavor and texture. For the best taste and quality, enjoy it sooner. Make sure to check for signs of freezer burn. If it looks icy or has a strange smell, it’s time to toss it.
Signs of Freezer Burn and How to Avoid It
Freezer burn appears as white patches or ice crystals on your ice cream. It happens when air reaches your ice cream. To avoid this, always store it in an airtight container. Also, avoid leaving it out for too long. When serving, scoop only what you need. Seal the container quickly to keep it fresh. If you see freezer burn, remove the affected areas before enjoying the ice cream.
FAQs
Can I Make Cherry Chocolate Chip Ice Cream Without an Ice Cream Maker?
Yes, you can make this ice cream without a machine. To do this, pour the mixture into a shallow dish. Place it in the freezer. Stir every 30 minutes for about 3-4 hours. This helps break up ice crystals, giving you a smoother texture.
What is the Nutritional Information for Cherry Chocolate Chip Ice Cream?
One serving of Cherry Chocolate Chip Ice Cream has about:
– Calories: 250
– Total fat: 14g
– Saturated fat: 8g
– Cholesterol: 70mg
– Sodium: 40mg
– Total carbs: 30g
– Sugars: 25g
– Protein: 3g
How to Use Leftover Ice Cream Ingredients?
You can get creative with leftover ingredients. Use extra cherries in a fruit salad. Mix the heavy cream with sugar and vanilla for a quick whipped topping. The whole milk can make a great base for pancakes or smoothies. Don’t let anything go to waste!
In this post, we explored how to make cherry chocolate chip ice cream. We covered key ingredients, from measurements to fresh versus frozen cherries. We learned to prepare the cherry mix and make the cream base. Tips on texture, storage, and serving ideas will help you enjoy your ice cream. You can also add nuts or make a dairy-free version. Remember to store it right to keep it fresh. I hope this guide inspires you to create your own tasty trea