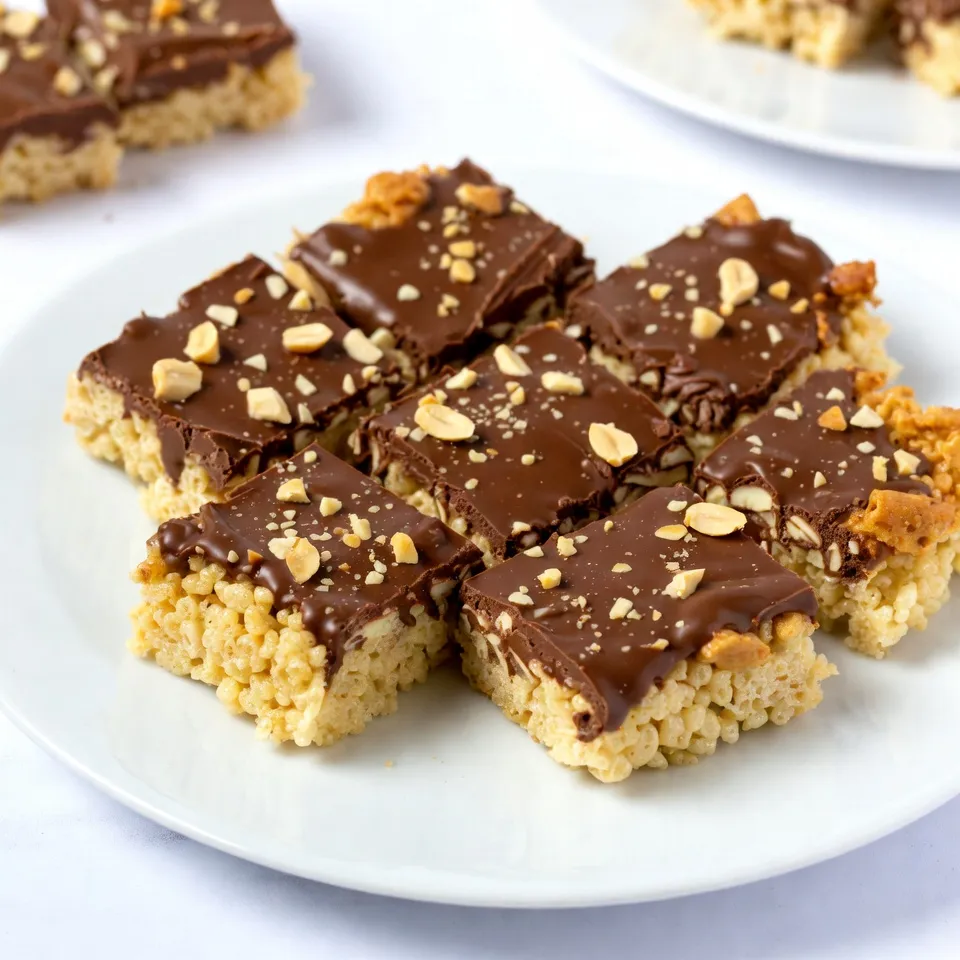
If you love a sweet and salty treat, you’ll adore my Chocolate Peanut Butter Rice Krispie Treats Delight! This easy recipe combines creamy peanut butter, rich chocolate, and crispy cereal for a snack everyone will enjoy. With just a few simple ingredients and quick steps, it’s perfect for any occasion. Ready to bring joy to your taste buds? Let’s dive into the details and make this delicious treat together!
Why I Love This Recipe
- Irresistible Flavor: The combination of chocolate and peanut butter creates a deliciously rich and satisfying taste that everyone loves.
- Quick and Easy: This recipe requires minimal ingredients and can be prepared in just 15 minutes, making it perfect for last-minute treats.
- Fun to Make: Mixing and melting ingredients is a fun activity that can involve the whole family, making it a great bonding experience.
- Customizable: You can easily add your favorite toppings or mix-ins, such as nuts or sprinkles, to personalize these treats to your liking.
Ingredients
To make Chocolate Peanut Butter Rice Krispie Treats, you need the following ingredients:
– Rice Krispies cereal: 4 cups
– Mini marshmallows: 1 cup
– Creamy peanut butter: 1/2 cup
– Milk chocolate chips: 1/2 cup
– Unsalted butter: 1/4 cup
– Vanilla extract: 1/2 teaspoon
– Pinch of salt
These ingredients come together to create a sweet and crunchy treat. The Rice Krispies give the base its classic crunch. Mini marshmallows add sweetness and a chewy texture. Creamy peanut butter brings a rich flavor that pairs perfectly with chocolate. The milk chocolate chips melt beautifully on top, adding a luscious finish. Unsalted butter is crucial for a creamy blend, while vanilla extract enhances all the flavors. A pinch of salt balances the sweetness.
With these ingredients, you’re ready to create a treat that your friends and family will love!

Step-by-Step Instructions
Preparation of the Baking Dish
Start by greasing a 9×13 inch baking dish with a thin layer of butter. You can also use parchment paper. This helps lift the treats out easily later.
Melting the Butter and Peanut Butter
In a large saucepan, place unsalted butter and creamy peanut butter over low heat. Stir gently until both melt together, creating a smooth mix. This step gives the treats their rich flavor.
Adding Mini Marshmallows
Once the butter and peanut butter mix is smooth, add the mini marshmallows. Keep stirring until they melt completely. This ensures a nice, gooey texture.
Mixing in Rice Krispies
Remove the saucepan from heat. Now, gently fold in the Rice Krispies cereal. Make sure every piece gets coated well, but don’t crush them. A gentle touch keeps the treats light.
Flavor Enhancements
Next, add 1/2 teaspoon of vanilla extract and a pinch of salt. These ingredients boost the flavor and make the treats even more delicious.
Spreading the Mixture in the Dish
Pour the cereal mixture into the greased baking dish. Use a spatula to spread it evenly. Lightly press down, but be careful not to squish the cereal. This keeps the treats airy.
Melted Chocolate Topping
In a microwave-safe bowl, place the milk chocolate chips. Heat them in 30-second intervals. Stir after each time until smooth. This creates a rich chocolate drizzle.
Spreading the Chocolate
After the Rice Krispies base cools a bit, pour the melted chocolate over the top. Use a spatula to spread it evenly. This gives the treats a beautiful finish.
Setting the Treats
Let the chocolate cool and set at room temperature for about 15-20 minutes. For a quicker set, place the dish in the fridge. Once firm, cut into squares for serving. Enjoy your delightful treats!
Tips & Tricks
Perfecting the Texture
To keep your Rice Krispies intact, treat them gently. When mixing, fold the cereal in slowly. Use a spatula to lift and turn the mixture rather than stirring hard. This way, you avoid crushing the crispy bits. I also recommend letting the marshmallow mix cool slightly before adding the cereal. This helps keep the cereal from getting soggy.
Flavor Boosts
Want to enhance the flavor? Try adding a pinch of cinnamon or a dash of sea salt. These can make your treats pop! You can also mix in some chocolate or peanut butter chips for extra taste. A splash of maple syrup or honey can add a nice sweetness too.
Presentation Tips
For a stunning presentation, serve your treats on a colorful platter. You can drizzle extra melted chocolate on top for flair. To add some crunch, sprinkle crushed peanuts or chocolate shavings just before serving. This not only looks good but also adds texture. Enjoy your beautiful creation!
Pro Tips
- Use Fresh Ingredients: Always ensure your marshmallows and chocolate chips are fresh for the best texture and flavor.
- Don’t Overheat the Chocolate: When melting chocolate, heat it in short intervals and stir frequently to avoid burning.
- Press Gently: When packing the Rice Krispies mixture into the pan, press down gently to maintain the treat’s light and crispy texture.
- Experiment with Toppings: Feel free to add toppings like crushed nuts or sprinkles for added flavor and visual appeal.
Variations
Nut Butter Alternatives
You can switch out peanut butter for almond or cashew butter. Both options taste great and add their own twist. Almond butter gives a nutty flavor, while cashew butter offers a creamy texture. Try these nut butters to change things up. Just use the same amount as peanut butter.
Flavor Variations
Want to add more flavor? You can mix in coconut flakes or drizzle caramel on top. Coconut adds a tropical touch, while caramel brings sweetness. You can also try adding a pinch of cinnamon for warmth. These additions make your treats even more special!
Gluten-Free Options
If you need a gluten-free option, make sure to use gluten-free Rice Krispies. Many brands offer gluten-free cereal now. This way, everyone can enjoy these treats without worry. Always check labels to be safe.
Storage Info
Storing the Treats
To keep your Chocolate Peanut Butter Rice Krispie Treats fresh, store them in an airtight container. This helps prevent them from becoming hard. You can layer them with parchment paper to keep them from sticking together. Keep the container at room temperature for the best taste. Avoid placing them in the fridge, as cool air may dry them out.
Freezing Instructions
You can freeze these treats for later enjoyment. First, cut them into squares. Wrap each piece tightly in plastic wrap. Then, place them in a freezer-safe bag or container. They can freeze for up to three months. When you’re ready to enjoy, take them out and let them thaw at room temperature. This keeps them soft and tasty.
Shelf Life
When stored properly, these treats last about one week at room temperature. Make sure to check for any signs of hardening or loss of flavor. If they’re frozen, you can keep them for about three months without losing quality. Enjoy them fresh for the best flavor and texture!
FAQs
Can I use a different type of cereal?
Yes, you can use other cereals. Some great options are:
– Cornflakes
– Cheerios
– Crispix
– Fruity Pebbles
These cereals will give your treats a fun twist. Each type adds a unique flavor and crunch. Experiment to find your favorite!
How can I make these treats chewy?
To make your treats chewy, try these tips:
– Use more mini marshmallows. This adds extra moisture.
– Add a little more peanut butter. It helps keep things soft.
– Don’t overbake the mixture. Just press it down gently.
These changes will give you that perfect chewy texture.
Is it possible to make these treats in advance?
Yes, you can make these treats ahead of time! Here’s how to prepare and store them:
– Make the treats as usual.
– Let them cool completely.
– Store in an airtight container.
Keep them at room temperature for up to a week. This way, you can enjoy them anytime!
How do I prevent the chocolate from seizing?
To prevent chocolate from seizing, follow these tips:
– Use a microwave-safe bowl.
– Heat chocolate in 30-second intervals. Stir each time.
– Add a small amount of oil or butter if needed.
These steps help keep the chocolate smooth and creamy. Enjoy your delicious drizzle!
Making these Rice Krispies treats is simple and fun. We covered the essential ingredients, step-by-step instructions, and helpful tips. You learned how to customize flavors and ensure perfect texture. With options for nut butters and gluten-free choices, everyone can enjoy them. Remember to store your treats properly for maximum freshness. I hope you make these treats your own and share them with friends and family. Enjoy your delicious creatio