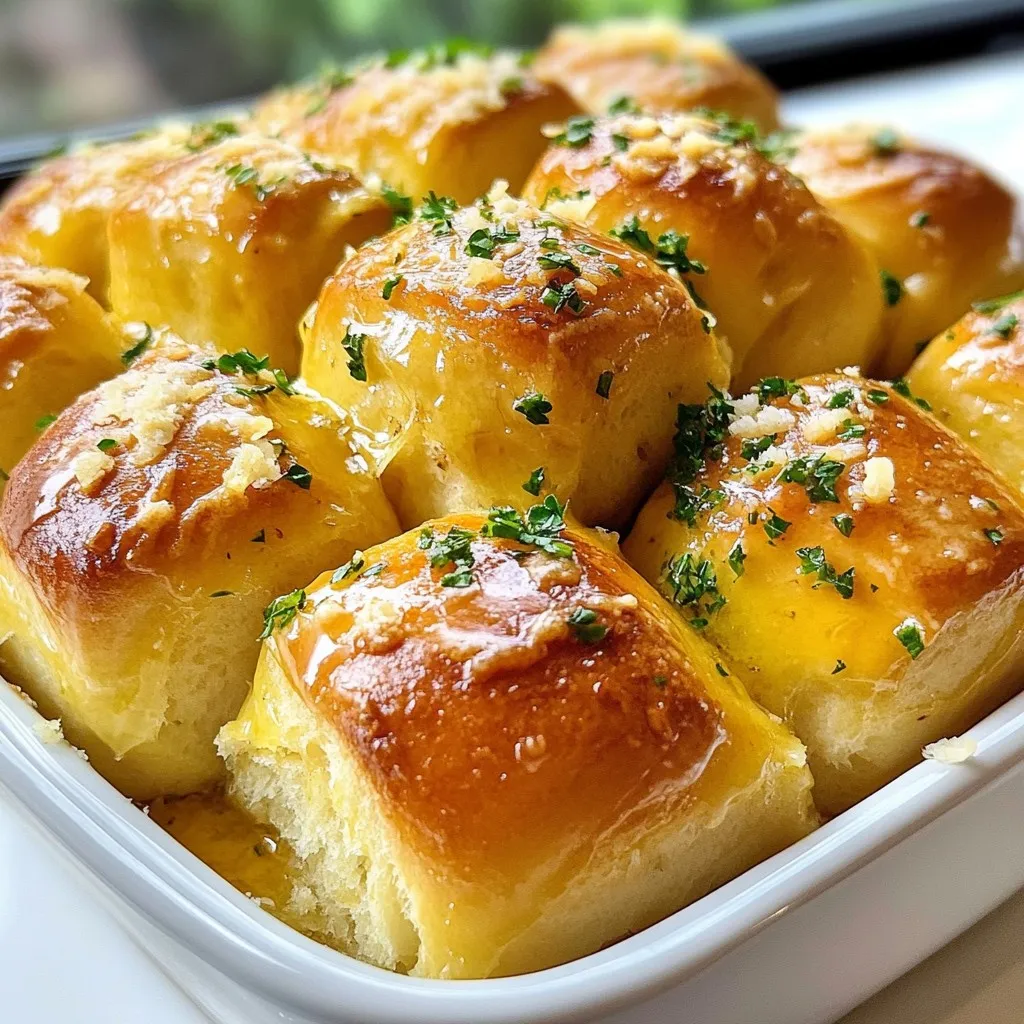
Are you ready to elevate your meal with a warm, cheesy treat? In this easy recipe for Garlic Parmesan Pull-Apart Rolls, you’ll find the perfect blend of soft dough and savory flavors. With just a few simple ingredients and step-by-step guidance, you’ll create rolls that melt in your mouth. Whether you’re a novice or a pro in the kitchen, these rolls will impress everyone at your table. Let’s get started!
Why I Love This Recipe
- Irresistible Flavor: The combination of garlic and Parmesan creates a mouthwatering aroma that fills your kitchen and makes these rolls impossible to resist.
- Easy to Prepare: This recipe is straightforward and requires no special baking skills, making it perfect for both beginners and experienced bakers.
- Perfect for Sharing: These pull-apart rolls are designed for sharing; they bring people together around the table for a delightful experience.
- Versatile Addition: Whether served as a side with dinner or enjoyed alone as a snack, these rolls fit perfectly into any meal or occasion.
Ingredients
Main Ingredients
– 3 cups all-purpose flour
– 1 packet (2 ¼ teaspoons) active dry yeast
– ½ teaspoon granulated sugar
– 1 teaspoon kosher salt
– ¼ cup unsalted butter, melted
– 1 cup warm milk (approximately 110°F or 45°C)
– 4 cloves garlic, finely minced
– ½ cup freshly grated Parmesan cheese
– 1 teaspoon dried Italian herbs (a blend of oregano and basil)
– 2 tablespoons fresh parsley, finely chopped
Equipment Needed
– Mixing bowls
– Measuring cups and spoons
– Bundt pan or round cake pan
– Rolling pin (optional)
To make these rolls, gather all the ingredients. Fresh ingredients make a big difference. The all-purpose flour gives the rolls their structure. The active dry yeast helps them rise. Sugar feeds the yeast, while salt adds flavor. Melted butter enriches the dough, and warm milk activates the yeast.
Minced garlic adds that bold taste, and freshly grated Parmesan brings a cheesy delight. Dried Italian herbs enhance the flavor. Finally, fresh parsley adds a pop of color and freshness.
For equipment, you need mixing bowls for combining ingredients. Measuring cups and spoons will ensure accuracy. A bundt pan or round cake pan is perfect for shaping the rolls. A rolling pin is optional but can help with dough prep if you choose to roll out the dough.
Now, you’re ready to create these soft and cheesy Garlic Parmesan Pull-Apart Rolls!

Step-by-Step Instructions
Preparing the Yeast Mixture
To start, we need to activate the yeast. Take a small bowl and mix together warm milk, sugar, and active dry yeast. Stir it gently and let it sit for about 5 to 10 minutes. You want to see it froth and bubble. This shows the yeast is active.
Next, grab a large mixing bowl. Whisk together all-purpose flour and kosher salt. Make a well in the center of the flour. Pour in the melted butter and the frothy yeast mixture.
Kneading the Dough
Now, it’s time to form the dough. Stir the mixture until it becomes a shaggy dough. Transfer the dough onto a lightly floured surface. Knead it for about 5 to 7 minutes. You want the dough to be smooth and elastic. Proper kneading helps develop gluten, making the rolls soft.
First Rise
After kneading, place the dough in a lightly greased bowl. Cover it with a damp cloth or plastic wrap. Let it rise in a warm spot for about 1 hour. The dough should double in size. This is a good sign that the yeast is working.
Shaping the Rolls
Once the dough has risen, gently punch it down to deflate it. Knead it for one more minute to keep it cohesive. Now, divide the dough into 12 equal pieces. Shape each piece into a small, smooth ball.
To coat the rolls, mix minced garlic, grated Parmesan cheese, and dried Italian herbs in a bowl. Dip each dough ball into melted butter to coat it. Then roll it in the garlic-Parmesan mixture for an even coating.
Second Rise
Arrange the coated dough balls in a greased bundt pan or round cake pan. Stack them slightly for that great pull-apart look. Lightly cover the pan and let the rolls rise for another 30 minutes.
Baking
While the rolls rise, preheat your oven to 350°F (175°C). After the second rise, place the rolls in the oven. Bake for 25 to 30 minutes. They should turn golden brown and puff up beautifully.
Once baked, remove them from the oven and brush the tops with more melted butter. Sprinkle chopped fresh parsley on top for added flavor. Enjoy pulling apart these soft, cheesy delights!
Tips & Tricks
Perfecting the Dough
To make great pull-apart rolls, avoid a few common mistakes. First, don’t rush the yeast activation. If your milk is too hot, it can kill the yeast. Always check the temperature. It should feel warm but not hot. Second, don’t skip the kneading step. Kneading helps develop gluten, which gives the rolls their soft texture.
For the right dough consistency, look for a smooth, elastic feel. If the dough is too sticky, add a bit more flour. If it’s too dry, a splash of milk can help. The dough should be soft but not stick to your hands.
Enhancing Flavor
To boost the flavor of your rolls, consider adding herbs and spices. Dried rosemary or thyme can add a lovely taste. You can also mix in some red pepper flakes for a hint of heat. If you want to swap out Parmesan, try mozzarella or cheddar. These cheeses melt beautifully and add a different twist.
Serving Suggestions
These rolls pair well with many meals. They are great with pasta dishes or soups. You can also serve them alongside a fresh salad. If you’re hosting a dinner, make these rolls a star of your feast. They look beautiful on a table and are fun to share. Try serving them with a warm, herbed dip for a tasty addition.
Pro Tips
- Activate Your Yeast: Make sure your milk is warm but not too hot, as temperatures above 120°F (49°C) can kill the yeast. This step is crucial for a good rise.
- Kneading Technique: Knead the dough until it’s smooth and elastic, which usually takes about 5-7 minutes. This develops the gluten, giving the rolls their structure.
- Flavor Infusion: For an extra flavor boost, let the garlic and herb mixture sit for a few minutes before rolling the dough balls in it. This allows the flavors to meld beautifully.
- Perfect Baking: Keep an eye on the rolls as they bake; if they start to brown too quickly, cover them loosely with aluminum foil for the remainder of the baking time.
Variations
Cheese Variations
You can switch up the cheese for your pull-apart rolls. Try adding mozzarella for extra stretch. Cheddar gives a sharp bite, while gouda adds a smoky flavor. If you want a twist, use feta or blue cheese for a unique taste.
For those who prefer vegan options, several substitutes work well. Look for vegan mozzarella or cream cheese. Nutritional yeast adds a cheesy flavor without dairy. You can also blend cashew cheese for a creamy texture.
Herb Variations
Fresh herbs can elevate your rolls. Consider using rosemary, thyme, or chives. These herbs bring fresh notes that brighten the flavor. You can mix dried herbs like oregano and basil, too.
Using flavored oils is another way to add depth. Garlic-infused olive oil or herb oil can pack a punch. Just brush it on your rolls before baking for a fragrant treat.
Sweet Versions
You can make a sweet version of these rolls, too. Swap garlic for cinnamon and sugar for a delightful twist. Add vanilla extract for extra flavor.
Incorporate fillings like chocolate chips, dried fruit, or nuts. These sweet pull-apart rolls can serve as a dessert or a fun breakfast treat.
Storage Info
Short-Term Storage
To keep your Garlic Parmesan Pull-Apart Rolls fresh, follow these steps:
– Let the rolls cool completely.
– Place them in an airtight container.
– You can also wrap them in plastic wrap.
This method keeps them soft for a few days. If you want them warm, reheat them briefly in the oven.
Long-Term Storage
For long-term storage, you can freeze your rolls:
– Freeze unbaked rolls by placing them on a baking sheet.
– Once frozen, transfer them to a freezer bag.
– For baked rolls, let them cool. Then, wrap them tightly in foil before freezing.
When you’re ready to enjoy, bake unbaked rolls directly from the freezer. Bake for about 30-35 minutes. For baked rolls, reheat them at 350°F for 10-15 minutes.
Shelf Life
Garlic Parmesan Pull-Apart Rolls last about three days at room temperature. After that, they may start to harden. Signs of spoilage include:
– A hard texture or dry surface.
– An off smell that is not buttery or garlicky.
– Mold or discoloration on the rolls.
When stored correctly, your rolls will stay tasty and enjoyable!
FAQs
Can I use instant yeast instead of active dry yeast?
Yes, you can use instant yeast. The main difference is that instant yeast does not need to be activated in warm milk. You can mix it directly with the dry ingredients. Use the same amount: one packet of instant yeast is about 2 ¼ teaspoons. If you use instant yeast, the dough may rise a bit faster.
How do I reheat leftover Garlic Parmesan Pull-Apart Rolls?
To reheat, wrap the rolls in foil and place them in a preheated oven at 350°F (175°C) for about 10-15 minutes. This keeps them soft and warm. You can also use the microwave. Heat them for about 15-20 seconds, but they may get chewy. Enjoy them fresh and warm for the best taste.
Can I make the dough ahead of time?
Yes, you can make the dough ahead. After kneading, cover it and place it in the fridge for up to 24 hours. When ready to use, let it sit at room temperature for about 30 minutes before shaping. This helps the dough rise better. You can also freeze the dough for up to three months. Thaw it overnight in the fridge before use.
What can I serve with Garlic Parmesan Pull-Apart Rolls?
These rolls pair well with many meals. Serve them with soups, salads, or pasta dishes. They also make a great side for grilled meats. For a fun snack, enjoy them with marinara sauce or a garlic dip.
You learned how to make Garlic Parmesan Pull-Apart Rolls from scratch. We explored the key ingredients, tools, and step-by-step guides. Each part of the process helps you create tasty rolls for any meal. Remember to experiment with flavors and variations. Proper storage keeps your rolls fresh for longer. Enjoy these rolls with friends and family, or make them for a feast. Now, it’s your turn to bake and share. Your kitchen adventure await