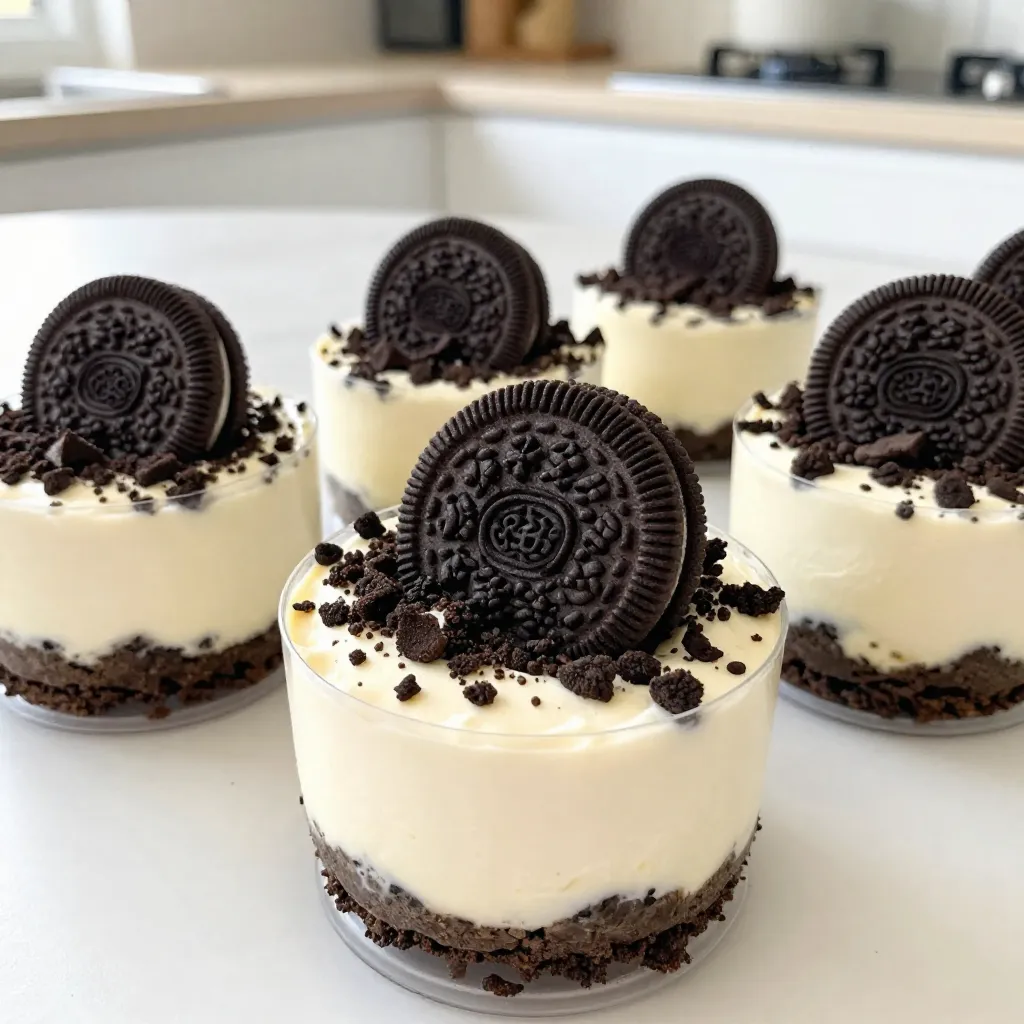
If you’re craving a sweet and simple treat, you need these No-Bake Oreo Cheesecake Cups! They are creamy, crunchy, and take barely any time to whip up. Plus, you can customize them with your favorite flavors. In this article, I’ll guide you step-by-step to create this delightful dessert that everyone will adore. Grab your Oreos and let’s get started on this fun treat!
Why I Love This Recipe
- Decadent Flavor: This recipe combines the rich taste of cream cheese with the beloved chocolate of Oreo cookies, creating a delightful dessert that’s hard to resist.
- Easy to Make: With simple steps and minimal ingredients, these cheesecake cups come together quickly, making them perfect for both novice and experienced bakers.
- Perfect for Any Occasion: These individual cheesecake cups are great for parties, gatherings, or even a cozy night in, allowing everyone to enjoy their own serving.
- Customizable: You can easily adapt this recipe by adding different toppings or flavors, making it a versatile dessert option for any taste preference.
Ingredients
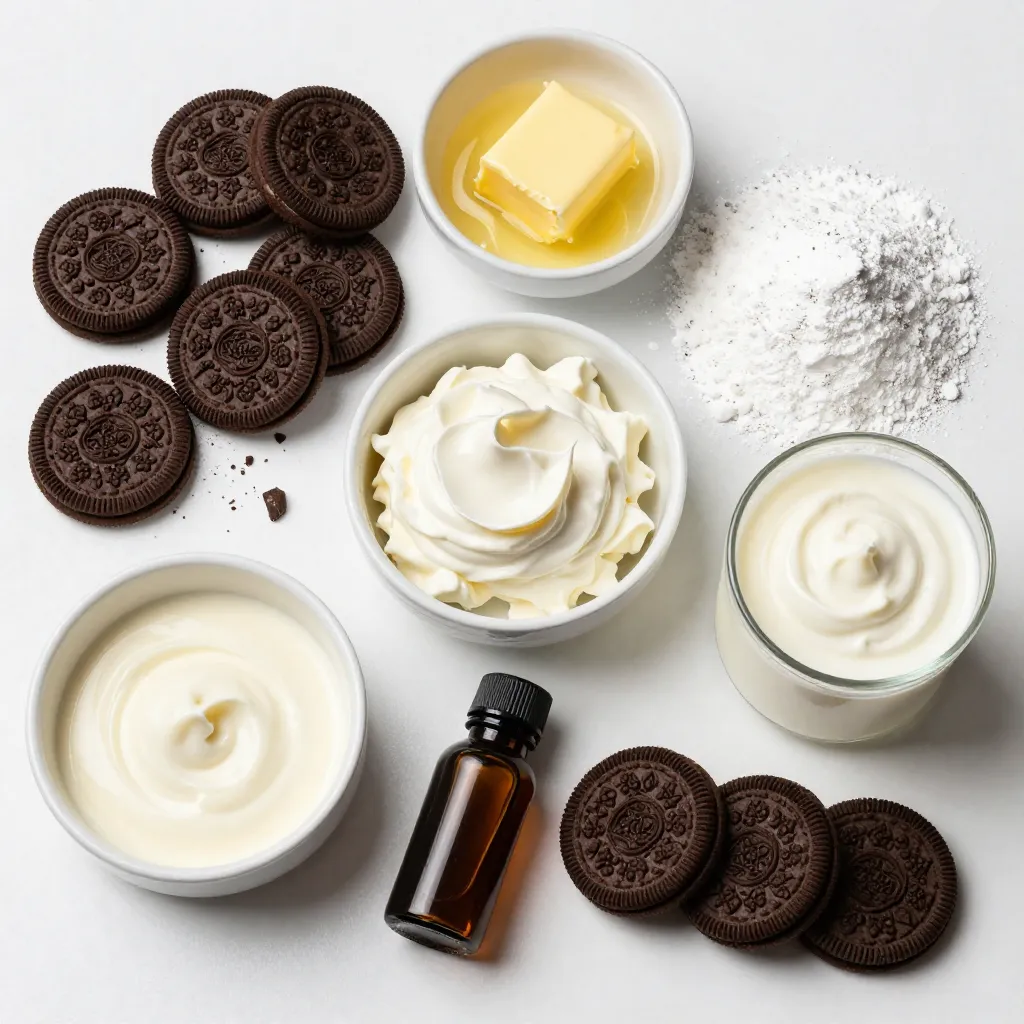
List of Ingredients
– 20 Oreo cookies, finely crushed
– 4 tablespoons unsalted butter, melted
– 16 ounces cream cheese, softened to room temperature
– 1 cup powdered sugar
– 1 teaspoon pure vanilla extract
– 1 cup heavy whipping cream, chilled
– 12 mini Oreos, for garnishing
Measurement Units
– Oreo cookies: standard size
– Unsalted butter: tablespoons
– Cream cheese: ounces
– Powdered sugar: cups
– Vanilla extract: teaspoons
– Heavy whipping cream: cups
– Mini Oreos: count
Ingredient Substitutions
– Use gluten-free Oreos for a gluten-free option.
– Substitute low-fat cream cheese for a lighter version.
– For a dairy-free choice, try cashew cream or coconut cream.
– You can swap powdered sugar with a sugar substitute if needed.
– If you lack heavy cream, use whipped coconut cream as an alternative.
Step-by-Step Instructions
Preparation of the Oreo Crust
To start, gather your ingredients. You need 20 Oreo cookies and 4 tablespoons of melted butter. Crush the Oreo cookies until they are fine crumbs. You can use a food processor or a zip-top bag and a rolling pin. Mix the crushed Oreos with the melted butter in a medium bowl. Stir until it looks like wet sand.
Next, take 8 small cups. Divide the Oreo-butter mix among them. Press the mixture firmly at the bottom of each cup. This forms a solid crust layer. Make sure the crust is even and compact. This step is key for keeping the filling in place.
Making the Cheesecake Filling
Now, let’s make the filling. In a large bowl, add 16 ounces of softened cream cheese. Use an electric mixer to beat it until it’s smooth. This should take about 2-3 minutes. Next, sift in 1 cup of powdered sugar. Add 1 teaspoon of vanilla extract. Mix until everything is fluffy and well combined.
In another bowl, pour 1 cup of chilled heavy cream. Use a hand mixer to whip it until stiff peaks form. This means the cream will hold its shape. Now, gently fold the whipped cream into the cream cheese mixture. Do this in two parts. Be careful to keep it light and airy.
Assembling the Oreo Cheesecake Cups
Now comes the fun part! Use a spoon or a piping bag to fill each cup with the cheesecake mix. Make sure to fill them all the way to the top. This gives a generous serving. For a crunchy finish, crush a few extra Oreos. Sprinkle the crumbs on top of the cheesecake.
To finish, place a mini Oreo cookie on each cup. Cover the cups with plastic wrap or lids. Refrigerate them for at least 4 hours. This helps the cheesecake set and enhances the flavor. Enjoy your tasty creation!
Tips & Tricks
Achieving the Perfect Whipped Cream
To make perfect whipped cream, start with chilled heavy cream. Cold cream whips better and faster. Use a clean bowl and beaters for best results. Beat the cream until you see stiff peaks. This means it holds its shape well. Be careful not to overwhip; it can turn into butter. Gently fold this whipped cream into your cheesecake mix. This keeps it light and fluffy.
Common Mistakes to Avoid
One common mistake is not chilling your cream. Warm cream does not whip well. Another mistake is overmixing the cheesecake batter. This can make it dense and heavy. Always fold the whipped cream gently into the cream cheese. Avoid pressing too hard, as you want to keep air in the mix. Lastly, don’t skip the chilling step after assembling. It helps the flavors meld and sets the texture.
Presentation and Serving Suggestions
Serve these cheesecake cups chilled for the best taste. Place a mini Oreo on top of each cup for a fun touch. You can also sprinkle extra crushed Oreos around the base. This adds color and texture, making it look fancy. For a twist, try serving them in clear cups. This way, everyone can see the layers. Enjoy these delightful treats at parties or family gatherings!
Pro Tips
- Use Room Temperature Ingredients: Ensure your cream cheese is at room temperature for a smoother, creamier filling without lumps.
- Whipping Cream Techniques: For best results, chill your mixing bowl and beaters before whipping the cream to achieve faster, stiffer peaks.
- Garnishing Ideas: Get creative with garnishes! Consider adding chocolate shavings or drizzles of chocolate sauce for added flair.
- Make-Ahead Option: These cheesecake cups can be made a day in advance. Just store them in the refrigerator until ready to serve for optimal flavor.
Variations
Flavor Variations
You can easily change the taste of your Oreo cheesecake cups. Adding peanut butter gives a nutty kick. Simply mix in half a cup of creamy peanut butter when you blend the cream cheese. For a mint twist, add a few drops of mint extract. This will create a fresh flavor that pairs well with Oreos. You can also mix in melted chocolate for a richer taste. Each of these options adds a fun twist to the classic recipe.
Dietary Adjustments
If you want a gluten-free version, use gluten-free Oreos. They taste just as good as regular Oreos. For a dairy-free option, swap cream cheese with a dairy-free cream cheese alternative. You can also use coconut cream instead of heavy whipping cream. This keeps the creamy texture while fitting dietary needs. Always check labels to ensure all ingredients meet your dietary restrictions.
Mini versus Regular Cup Sizes
Mini cups are perfect for small bites, great for parties. They let you enjoy a taste without too much dessert. To make mini cups, use smaller serving cups and reduce the filling amount. Regular cups are ideal for a full dessert experience. Each size has its charm, so choose based on your gathering or mood.
Storage Info
Proper Refrigeration Techniques
To keep your no-bake Oreo cheesecake cups fresh, store them in the fridge. Use an airtight container or cover each cup with plastic wrap. This keeps moisture out and prevents the cheesecake from absorbing other smells. Make sure your fridge is set to 40°F or below. This will help keep your dessert safe to eat.
Freezing Instructions
You can freeze these cheesecake cups for later enjoyment. First, let them chill in the fridge for about four hours. Once set, wrap each cup tightly in plastic wrap. Place them in a freezer-safe container. They will stay fresh for up to two months. When you’re ready to eat, thaw them in the fridge overnight.
Shelf Life and Best Practices
These delicious cups taste best when eaten within five days. After that, they may lose their creamy texture. Always check for any changes in smell or appearance before eating. For the best flavor, serve them fresh after making. If you have leftovers, remember the proper storage tips to keep them tasty!
FAQs
How long do no-bake Oreo cheesecake cups last?
No-bake Oreo cheesecake cups last about 3 to 5 days in the fridge. The taste stays fresh if stored properly. I recommend keeping them in an airtight container. This helps maintain their creamy texture and flavor.
Can I make these cheesecake cups ahead of time?
Yes, you can make these cheesecake cups ahead of time. They taste even better after chilling for a few hours or overnight. This gives the flavors time to blend. Just remember to cover them well before refrigerating.
What can I use instead of cream cheese?
If you want to swap out cream cheese, try using mascarpone. It has a smooth texture and similar taste. You can also use Greek yogurt for a lighter option. Just note that it may change the flavor a bit.
Are there any tips for making these cheesecake cups gluten-free?
To make these cheesecake cups gluten-free, use gluten-free Oreo cookies. Many brands offer tasty alternatives. Check the labels to ensure they meet your needs. This way, everyone can enjoy this dessert without worry.
How do I store leftovers?
To store leftovers, place the cups in the fridge. Use an airtight container or cover them with plastic wrap. This keeps them fresh and prevents odors from mixing. Enjoy your tasty treat for a few days!
To make delicious no-bake Oreo cheesecake cups, follow the steps outlined. We shared key ingredients, preparation methods, and tips to avoid common mistakes. Remember, you can customize flavors and adjust for dietary needs. Proper storage keeps your treats fresh longer. Try these ideas for a fun twist on a classic dessert. Enjoy your cheesecake cups and impress your friends and famil