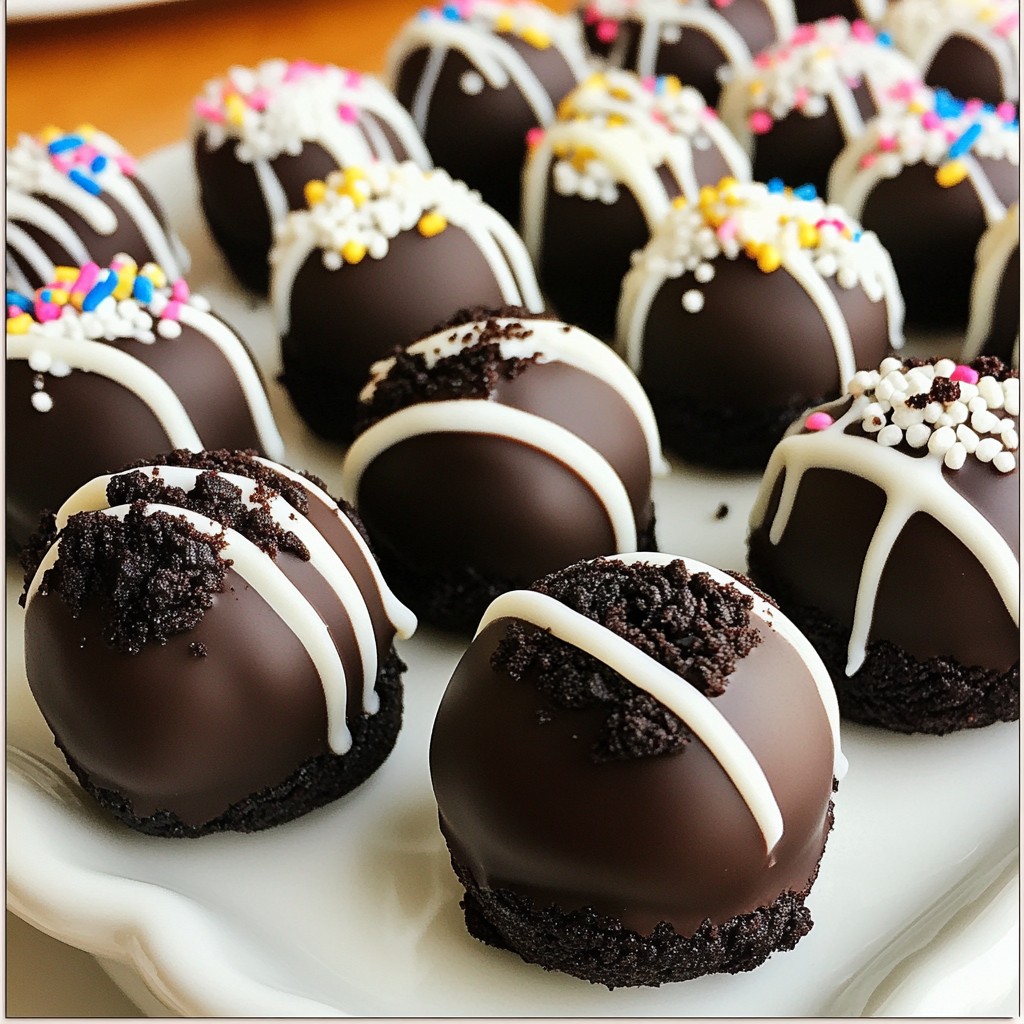
When craving a sweet treat, No Bake Oreo Truffles are your answer! With just a few ingredients, you can whip up these delicious bites in no time. They’re easy to make and even easier to devour. Perfect for parties or a simple dessert, I’ll guide you through every step. Let’s dive into this quick recipe that promises happiness in every bite. Ready to make your own?
Why I Love This Recipe
- Decadent Flavor: These truffles combine the rich taste of chocolate with the iconic flavor of Oreo cookies, creating a delightful treat that’s hard to resist.
- Easy to Make: With just a few simple steps and minimal ingredients, anyone can whip up these truffles in no time, making them perfect for both beginners and experienced bakers.
- Versatile Presentation: These truffles can be dressed up with different toppings and colors, making them suitable for any occasion, from casual gatherings to festive celebrations.
- Fun to Customize: Feel free to get creative with add-ins and decorations, such as nuts, different types of chocolate, or seasonal sprinkles, to make them uniquely yours.
Ingredients
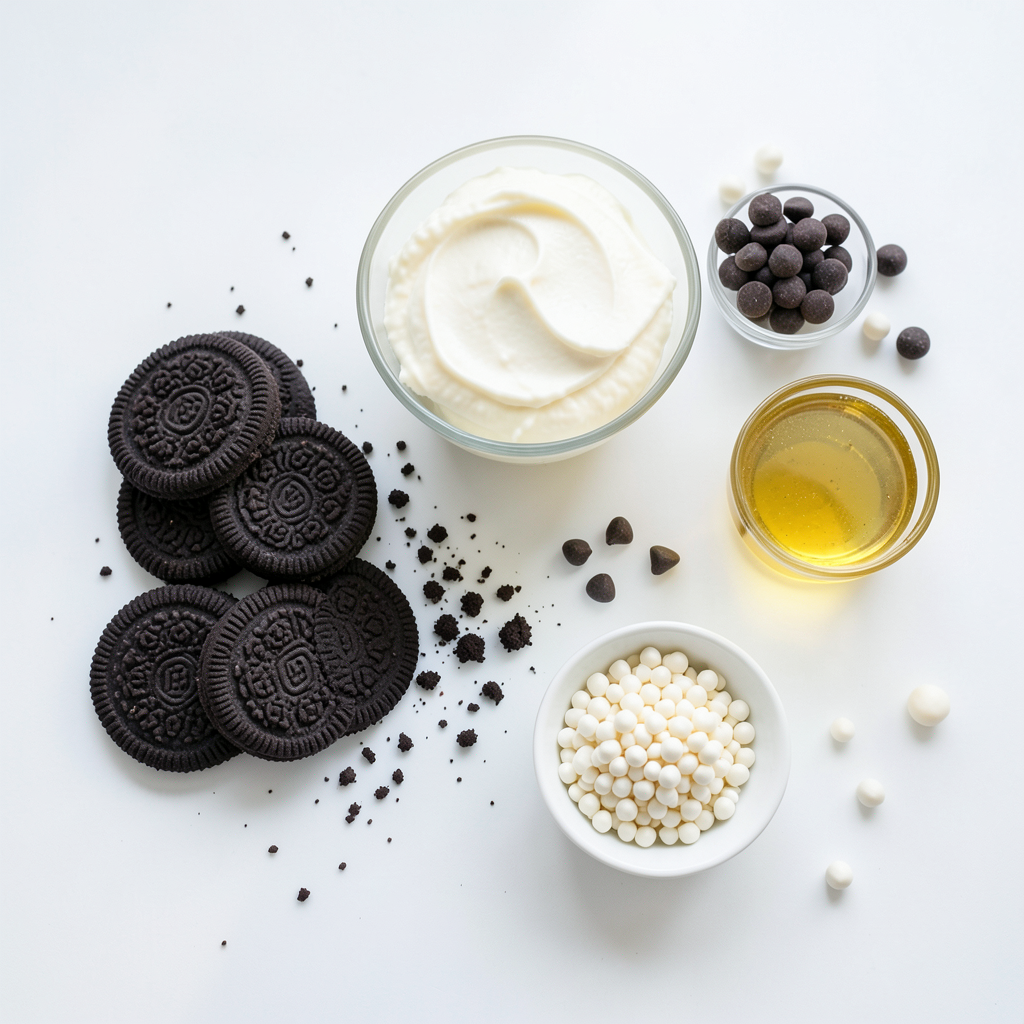
List of Ingredients
- 36 Oreo cookies
- 8 oz cream cheese
- 1 cup semi-sweet chocolate chips
- 1 tablespoon coconut oil (optional)
- 1/2 cup white chocolate chips
- Optional garnishes (sprinkles or additional crushed Oreos)
Preparation Time
- Prep Time: 20 minutes
- Total Time: 1 hour 5 minutes
- Servings: Makes approximately 24 truffles
When I make these truffles, I love how simple the ingredients are. You only need six items to create a delicious treat. The star of the show is the Oreo cookies. Their rich flavor brings a fun twist to these truffles. The cream cheese adds a creamy texture, making each bite smooth and delightful.
You can use regular or double-stuffed Oreos, depending on your taste. The semi-sweet chocolate chips give a nice chocolatey coating that everyone loves. If you want a silkier finish, add some coconut oil when melting the chocolate. It’s not a must, but it can make a big difference.
For a lovely touch, I often drizzle white chocolate on top. It looks pretty and tastes great too! You can also use sprinkles or crushed Oreos to decorate the truffles. This makes them look festive and fun for any occasion.
Getting ready to make these? You’ll be amazed at how quick it is! The prep time is only 20 minutes, and you can chill the truffles for 30 minutes. In just over an hour, you’ll have 24 tasty treats to enjoy or share with friends.
Step-by-Step Instructions
Mixing Oreo and Cream Cheese
Start by taking 36 Oreo cookies and finely crushing them. You can use a food processor or place them in a sealed bag and crush with a rolling pin. Next, take 8 ounces of softened cream cheese and add it to the bowl with the crushed Oreos. Use a spatula or your hands to mix them well. You want a smooth and dough-like consistency. This step is key for the rich flavor and texture of the truffles.
Shaping the Truffles
After mixing, take small portions of the Oreo mixture. Roll each portion into a ball, about 1 inch in diameter. This size makes them easy to eat and handle. Once you shape all the balls, place them on a baking sheet lined with parchment paper. The parchment paper prevents sticking and makes cleanup easier.
Chilling the Truffles
Now it’s time to chill. Refrigerate the baking sheet with the truffles for 30 minutes. This helps them firm up before you coat them with chocolate. Chilling also improves the flavor, making each bite even more delicious. After 30 minutes, your truffles will be ready for the next step!
Tips & Tricks
Melting Chocolate Perfectly
To melt chocolate, you have two great methods: the microwave or the double boiler. The microwave is quick. Use a microwave-safe bowl. Heat the chocolate chips in 30-second bursts. Stir in between. This helps to avoid burning. The double boiler gives you more control. Place a heat-safe bowl over simmering water. Stir until smooth.
For a silkier texture, add coconut oil. Just one tablespoon works wonders. It makes the chocolate easier to dip and gives a nice shine.
Dipping Techniques
When you dip the truffles, make sure to coat them evenly. Use a fork for this. It helps you get a nice layer of chocolate. After dipping, let excess chocolate drip off. This way, you avoid clumps. Place them back on the parchment paper to set.
Decorative Touches
Make your truffles stand out by drizzling white chocolate on top. Melt the white chocolate in the same way as before. Use a spoon or a piping bag for more control. Drizzle it artfully over the truffles.
While the white chocolate is still warm, add sprinkles or crushed Oreos. This adds both flavor and visual appeal. The colorful toppings make them look fancy and fun.
Pro Tips
- Chill Thoroughly: Make sure to chill the truffles for the full 30 minutes after rolling them. This helps them maintain their shape when dipped in chocolate.
- Quality Chocolate: Use high-quality chocolate for melting. It not only tastes better but also melts smoother, giving your truffles a professional finish.
- Experiment with Flavors: Feel free to add additional flavors to the cream cheese mixture, such as vanilla extract or mint extract, for a unique twist on the classic Oreo flavor.
- Decorative Garnish: Use different types of sprinkles or even edible glitter to customize the appearance of your truffles for special occasions.
Variations
Flavor Combinations
You can have fun with flavors in these truffles. Try adding peanut butter or almond extract to the mix. Just a little can change everything! For a twist, use flavored Oreo cookies like mint or birthday cake. These flavors add an exciting kick to your treats.
Chocolate Options
Change up the chocolate for a new taste. Use dark or milk chocolate instead of semi-sweet. This makes the truffles sweeter or more rich. You can also drizzle different types of chocolate, like caramel or colored chocolate, on top. These add fun colors and flavors, making your truffles stand out!
Presentation Ideas
How you present your truffles can make them even more special. Use decorative serving platters or colorful cupcake liners to serve. This adds a festive touch! You can also use themed decorations for holidays or events. Adding sprinkles or fresh mint leaves makes them look even more appealing. A little extra effort goes a long way!
Storage Info
Proper Storage Techniques
To keep your truffles fresh, store them in the refrigerator. Place them in an airtight container. This keeps them moist and tasty. If you stack them, use parchment paper between layers. This helps prevent sticking. Enjoy your truffles for days without losing flavor!
Freezing Truffles
You can freeze these truffles for longer storage. First, let them cool in the fridge. Then, place them on a baking sheet. Freeze for about an hour. After they are firm, transfer them to an airtight container. They can last up to three months in the freezer. When you want to eat them, take out the desired amount. Thaw them in the fridge overnight for best results.
Shelf Life
In the fridge, these truffles last about a week. If stored properly, they stay fresh and delicious. In the freezer, they can last for three months. Just remember to keep them sealed tight to avoid freezer burn. Enjoy your treats fresh or frozen!
FAQs
Can I use low-fat cream cheese?
You can use low-fat cream cheese if you prefer. However, it might change the taste and texture. Low-fat cream cheese can be less creamy and rich. The truffles may not hold together as well. For best results, stick with regular cream cheese.
How long can No Bake Oreo Truffles be stored?
You can store these truffles for up to one week in the fridge. Keep them in an airtight container to maintain their freshness. If you freeze them, they can last for up to three months. Just remember to thaw them in the fridge before serving.
What can I substitute for Oreo cookies?
There are many cookies you can use instead of Oreos. Try using chocolate sandwich cookies or even a different flavor like peanut butter cookies. For a fun twist, use graham crackers or chocolate wafers. The key is to find a cookie that can be crushed well.
Can I make these truffles ahead of time?
Yes, you can make these truffles ahead of time. Prepare them a day before your event. Just store them in the fridge or freezer. If you freeze them, let them sit in the fridge for a few hours before serving. This way, they will be ready and tasty for your guests!
You learned how to make delicious No Bake Oreo Truffles. We covered the ingredients, preparation steps, and helpful tips for success. Remember, choose the best chocolate methods and decorations to impress. Feel free to experiment with flavors and keep them fresh in the fridge. Whether for a party or a treat for yourself, these truffles are sure to please. Enjoy making and sharing this fun dessert!